Connect with us

Home improvement

Reviving Your Home: The Practical Guide to Hardwood Floor Refinishing

Published

on

Reviving Your Home: The Practical Guide to Hardwood Floor Refinishing

Key Takeaways:

  • Refinishing hardwood floors enhances their appearance and increases home value.
  • The process is intricate and requires careful planning and consideration.
  • Professional services are recommended for high-quality, long-lasting results.
  • Maintenance after refinishing is crucial for preserving the rejuvenated look.

A home’s charm often lies in the details; nothing exudes classic elegance like well-maintained hardwood floors. But even the sturdiest of woods is not immune to the rigors of life. Over time, scratches will surface, the sheen will dull, and what was once a source of pride can become a lackluster feature of your living space. This is where hardwood floor refinishing steps in, not merely as a corrective measure but as a transformative home improvement project. 

The Benefits of Refinishing Hardwood Floors

Undertaking a hardwood floor refinishing project is more than an exercise in aesthetics. It’s an investment in your home’s future and a celebration of its past. The grains and textures of natural wood flooring tell a revitalized story with each sanding and coating. Not only does the process enhance the appearance of the wood, but it also provides a protective layer against future wear and tear. The tangible result is a significant increase in home value, as freshly refinished floors are a coveted feature for prospective buyers. Enlisting the expertise of SOEN Hardwood Floor Refinising could be an invaluable step in maintaining the integrity and beauty of your home’s interior.

Understanding Wood Floor Wear and Tear

Before diving into the refinishing process, it’s essential to assess the condition of your floors. Hardwood can endure considerable stress, accommodating everything from boisterous family gatherings to the pitter-patter of pet paws. Despite its resilience, signs of aging inevitably surface, manifesting as fine lines that mar its finish or deeper gouges that penetrate its core. Sunlight can fade its vibrant color, and water damage can warp its smooth contour. Recognizing these symptoms early enables homeowners to intervene with refinishing measures before the damage progresses.

Choosing the Right Time to Refinish

Timing your refinishing project is akin to finding the sweet spot in home improvement initiatives. It’s about the visible signs of wear and aligning the project with conducive environmental conditions. The moderate spring and fall temperatures are ideal for refinishing, as they typically offer the low humidity necessary for the finishes to cure correctly. Planning the project when the home can be vacated also minimizes inconvenience, as the refinishing process can be noisy and dusty and necessitates a clear space.

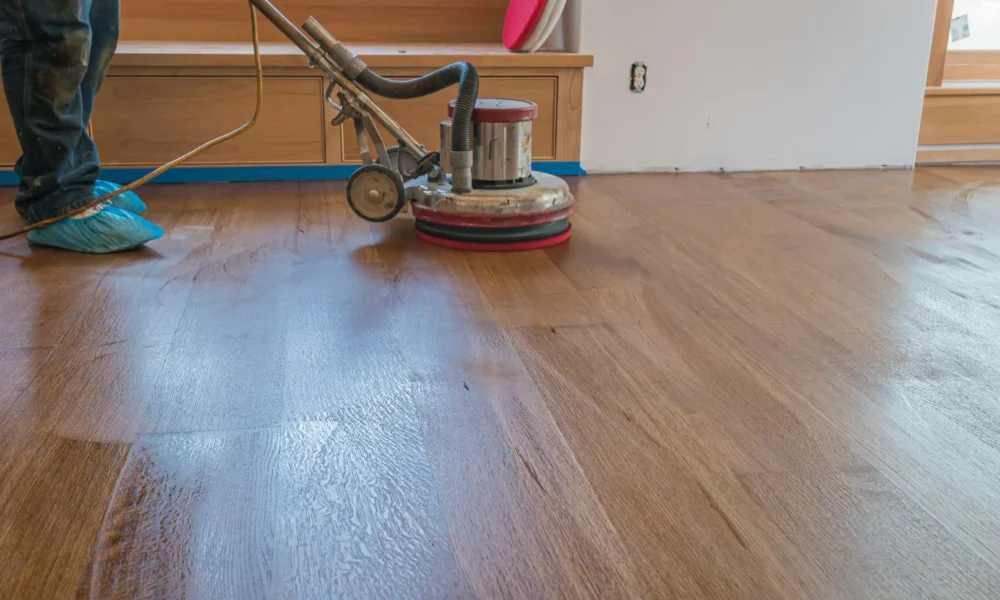
The Refinishing Process Explained

Refinishing hardwood floors is a multi-step orchestra of sanding, staining, and sealing. The journey begins with sanding down the existing finish to a bare wood surface, a necessary step for ensuring an even application of the new stain. Stain selection follows, allowing homeowners to tailor the look of their floors to the current décor or to set a new tone for their interior space. Once the stain is applied and dried, several coats of sealant protect the wood and lend a durable, polished appearance. The entire process not only revives the floor’s look but fortifies its structure for the future.

Duration and Drying Times

The duration of a refinishing project varies based on the size of the area and the extent of damage. A general rule of thumb is a few days of hands-on work and additional time for the floors to cure. Patience becomes a virtue as this drying time is crucial for achieving a resilient finish. During this period, foot traffic and furniture placement are big no-nos. It’s typically advised to allow a whole week for the process from start to finish, ensuring that new life breathed into your floors has the time it needs to set.

DIY versus Professional Refinishing Services

The DIY path can be alluring, especially with abundant tutorials at our fingertips. However, refinishing hardwood floors is different than cutting one’s teeth using DIY skills. The potential for mistakes—uneven sanding, improper staining, bubbles in the sealant—is high and can lead to less-than-desirable results. This is one area where hiring professionals like SOEN Hardwood Floor Refinishing is a wise choice. Their experience, specialized equipment, and expert touch almost always guarantee a showroom-quality finish.

Post-Refinishing Care for Long-Lasting Results

Once the refinishing process is complete, the journey to maintaining your floors’ newfound splendor begins. Protective mats, regular dusting, immediate spill cleanup, and periodic deep cleaning will keep the finish and integrity of the hardwood. These small acts of preventive care can stave off the need for another refinishing job for many years. Homeowners looking for guidance on floor maintenance would benefit from the knowledge shared by This Old House, a trusted resource for in-home care and improvements.

Cost Analysis of Refinishing Hardwood Floors

The cost of refinishing hardwood floors can be significant but must be weighed against the substantial benefits. Expenses vary depending on floor size, wood condition, type of finish, and labor costs. Some may be tempted to cut costs with a DIY approach, but entrusting professionals ensure that the investment pays off in the short and long term. The aesthetic improvement and longevity that professional refinishing brings often outweigh the initial outlay.

Navigating the Choices of Finishes and Stains

Wood is a highly versatile material, able to take on various shades and finishes to match any design vision. From the classic gloss to a chic matte and from the deepest ebony to the lightest oak, choices abound. Modern trends lean towards eco-friendly finishes and subdued, natural tones, as noted in insights from Architectural Digest. The selections made during this phase significantly impact the living space’s ambiance, transforming a home through the ground on which it stands.

In conclusion, hardwood floor refinishing is not just a maintenance task— it enhances the home’s interior beauty and market value. With careful planning, skilled execution, and attentive post-care, your hardwood floors will stand as a testament to your home’s enduring elegance for years to come.

Continue Reading
Click to comment

Leave a Reply

Your email address will not be published. Required fields are marked *

Home improvement

The Hidden Dangers of Brown Mold in Buildings

Published

on

The Hidden Dangers of Brown Mold in Buildings

Have you ever wondered just how dangerous brown mold could be lurking in your living spaces? This seemingly innocuous type of mold can pose significant threats to your health and property.

In our upcoming blog post, we’ll uncover the hidden dangers of brown mold, how to identify it, and the effective steps you can take to safeguard your environment. By the end, you’ll have the essential knowledge to protect yourself and your loved ones from this silent invader.

What is Brown Mold?

Brown mold, also known as Stemonitis, is a type of mold that can grow in damp areas. It’s often found in places like basements, bathrooms, or any area with high humidity. This mold isn’t an eyesore; it can damage your property and health.

Why Brown Mold is Dangerous

Brown mold is dangerous because it can cause a range of respiratory issues, especially in vulnerable individuals such as children and the elderly. Additionally, it can compromise the structural integrity of your home by weakening wood and other materials.

Health Risks

Brown mold can cause a range of health problems. You might experience allergies, headaches, or respiratory issues. If you have asthma or other lung conditions, it can make things worse. Prolonged exposure can lead to serious health concerns.

Property Damage

Brown mold can also damage your property. It feeds on organic materials, which means it can eat away at wood, paper, and even some fabrics. This can weaken the structure of your home over time, leading to costly repairs.

How to Spot Brown Mold

Brown mold can be tricky to find. It often hides behind walls, under carpets, or in crawl spaces. Here are a few signs to watch for:

Discoloration

Look for brown or rusty stains on the walls. Check ceilings as well.

Musty Smell

A strong, musty odor can be a sign. Hidden mold may be present.

Allergy Symptoms

If you notice your allergies acting up, it might be due to mold. Check your environment for any signs of mold growth.

Preventing Brown Mold

The key to preventing brown mold is to control moisture levels in your home by using dehumidifiers and ensuring proper ventilation. Regularly inspecting and repairing leaks can also help keep mold at bay and protect your living spaces.

Control Humidity

One of the most effective methods to prevent brown mold, and building mold in general, is to manage the humidity levels in your home. Use dehumidifiers, particularly in damp areas such as basements. Ensure your home is well-ventilated to cut moisture.

Clean Regularly

Keep your home clean and dry to prevent house mold. Regularly clean bathrooms and kitchens, as these areas are prone to mold growth. Use mold-killing products during cleaning to keep house mold at bay.

What to Do If You Find Brown Mold

If you find brown mold, it’s best to call in the experts. Removing mold can be tricky and dangerous if not done properly. Certified mold removal in Caldwell, NJ, can help you get rid of mold safely and effectively.

Safeguarding Your Home from Brown Mold

In conclusion, brown mold is a silent yet serious threat to both your health and your home. By understanding what brown mold is and how to identify it, you can take proactive steps to prevent its growth. Controlling humidity, fixing leaks, and regular cleaning are key preventative measures.

Should you encounter brown mold, seek professional help to ensure safe and effective removal. Prioritizing these actions will help protect your living environment from the potentially harmful effects of brown mold.

Want to learn more? Explore our other articles before you leave!

Description: Brown mold in buildings can pose serious health risks to occupants. Learn about the hidden dangers of brown mold and how to address this issue effectively.

Continue Reading

Home improvement

6 Essential Elements of a Well-Designed Roof Detail

Published

on

6 Essential Elements of a Well-Designed Roof Detail

Designing a roof involves more than picking materials. A well-designed roof detail ensures durability. How do you achieve this?

It must handle various weather conditions. Consider the importance of a good roof design. It isn’t for aesthetics.

A proper roof detail prevents leaks and damage. Are you aware of all the essential elements involved? This blog will explore those crucial factors.

From water management to thermal insulation, every aspect matters. Let’s dive into what makes your roof design good and exceptional.

1. Water Management

Proper water management is essential in all roof designs. Any damage caused by water can be expensive and time-consuming to fix. A well-designed roof detail should have a reliable drainage system to prevent standing water or leaks. This includes:

  • gutters
  • downspouts
  • proper sloping

Various types of industrial roof drainage systems, such as internal drains and scuppers, are crucial to ensure efficiency. Regular maintenance and inspections are also key to prolonging the lifespan of these systems.

2. Structural Support

A well-designed roof must have adequate structural support to handle various weather conditions. This includes wind, snow, and heavy rain loads.

The design should also consider the weight of the roofing material itself. It is important to consult with a structural engineer to ensure that the roof can withstand these elements and support its weight without compromising the safety of the building’s occupants.

3. Thermal Insulation

Insulation helps regulate temperature and plays a crucial role in preventing moisture buildup. This is especially important in areas with extreme weather conditions.

Proper insulation can reduce energy costs, prevent mold growth, and improve comfort within the building. Choose appropriate insulation materials and install them to achieve optimal results.

4. Ventilation

Proper ventilation keeps your attic and roof cool, preventing moisture buildup and mold growth. It also helps with regulating temperatures and reducing energy costs.

A good roof design should have adequate ventilation through vents, soffits, or ridge vents. Proper placement and sizing of ventilation openings are crucial to ensuring air circulation.

5. Flashing

Flashing refers to the material used to create a water-resistant barrier around openings on the roof. It includes

  • chimneys
  • skylights
  • vents

A well-designed roof detail must include flashing to prevent leaks and water damage. It is important to use high-quality materials and install them to ensure effectiveness.

6. Quality Materials

A well-designed roof detail should use high-quality materials that are durable and can withstand various weather conditions. This includes the roofing material and the underlayment, flashing, and other components used in the design. It may be tempting to cut costs by using cheaper materials, but in the long run, investing in quality materials will save you time and money on repairs and replacements.

Learn These Essential Elements of a Well-Designed Roof Detail

A well-designed roof detail is crucial for the longevity and efficiency of your roof construction. Each element, from water management to the choice of quality materials, plays a significant role in ensuring your roof can withstand various weather conditions and provide lasting protection.

By paying attention to these essential elements, you can achieve a roof design that looks great and offers reliable and durable performance. Investing time and resources in proper roof detail will save you from costly repairs and replacements.

Did you find this article helpful? If so, check out the rest of our site for more informative content.

Continue Reading

Home improvement

DIY vs Professional Lock Repairs: What’s the Best Option?

Published

on

DIY vs Professional Lock Repairs: What's the Best Option?

When it comes to lock repairs, you’ve got two options: do it yourself or call a pro. Each choice has its own perks and pitfalls. DIY might save you some bucks, but it can be tricky.

Hiring a professional can be more costly, but it’s usually quicker and safer. So, which one is best for you? Let’s explore both sides to help you decide.

DIY Lock Repairs

Doing it yourself can be tempting, especially if you enjoy hands-on projects. Here are some key points to consider:

Cost Savings

Repairing a lock yourself can save you money. You do not need to pay for professional labor. You only spend on the parts needed for the repair. This can be cheaper than hiring a locksmith.

DIY auto lock repair can be particularly cost-effective if you already have some tools. However, it is important to know your limits to avoid further damage.

Learning Experience

Repairing a lock yourself can be a valuable learning experience. You can gain new skills and knowledge that might be useful in the future. Understanding how locks work can give you more confidence in dealing with similar issues.

Plus, completing a repair on your own can provide a sense of accomplishment and satisfaction. By learning through hands-on practice, you can also improve your problem-solving abilities.

Professional Lock Repairs

On the other hand, hiring a professional locksmith has its advantages:

Expertise

Professional locksmiths bring a high level of expertise to every job. They have years of training and experience dealing with all types of locks. This ensures that they can quickly and efficiently diagnose and fix any issues.

Additionally, they use specialized tools that most people do not have access to. This reduces the likelihood of causing further damage to the lock.

For more complex needs, such as car key replacement, a professional’s skills are invaluable. They can provide reliable and hassle-free service, saving you time and stress.

Time-Efficient

Hiring a professional locksmith is time-efficient. They can quickly diagnose and repair the problem without guesswork. This is important if you are in a hurry or if the lock is critical for your safety. Professional locksmiths can complete the job faster than most DIY attempts.

They have the right tools and experience to get it done efficiently. This saves you time and effort. Plus, using a lock replacement service means you get guaranteed results with minimal fuss. You won’t have to worry about spending hours trying to fix the lock yourself.

Safety

When it comes to safety, professional locksmiths have a clear advantage. They know how to repair and install locks correctly, ensuring that your property is secure. Attempting a DIY lock repair can sometimes result in mistakes, which may leave your home or car vulnerable to break-ins.

Professionals use high-quality parts and the latest techniques to enhance security. This provides peace of mind, knowing that the job is done right. Additionally, a locksmith can offer advice on the best types of locks for your specific needs, further enhancing your overall safety.

Learn All About Lock Repairs

In conclusion, whether to DIY or hire a pro for lock repairs depends on your skills and situation. DIY can save money and teach you new things, but might lead to mistakes. Hiring a locksmith is quick, safe, and reliable, though it costs more. So, choose wisely based on your needs!

Did you find this article helpful? Check out the rest of our blog.

Continue Reading

Trending